Tool Storage In Your Shop
In addition to the physical differences, there are differences in the way that we work and differences in the type of wood working we do.
That said, I think there are some generally acceptable guidelines for storing your tools.
A. Store similar tools together. Ex: All the drill bits.
B. Store tools near where they will be used. Ex: All the drill bits near the drill press.
C. Where ever possible, make a container, hook, or specific location for each tool. If a tool doesn’t have a ‘home’, it seems to move around the shop all by itself.
Sometimes ‘B’ means you can’t do ‘A’. Ex: 99% of all my wrenches are stored in a tool box, but the wrench I use to change blades on my table saw is hanging on a magnet beside the table saw. Another example: I keep most of my squares together, hanging on pegboard over my workbench. One exiled square is 20 feet away from the others, hanging by my miter saw.
My shop started with a few hand tools for fixing stuff, things like a hammer, screwdriver, pliers, bubble gum and paperclips. At that stage, my shop was a single drawer in the kitchen. Then I discovered that I needed two screwdrivers, that there were several types of pliers that were useful. Toss in a 10-point hand saw or a 2-ft. level and I outgrew that drawer.
When I decided to get into woodworking (as opposed to just fixing things) I was lucky enough to have a full, walk-out basement at my disposal. However, the basement was full of boxes that had been moved from house to house without ever being opened. Gradually the size of the shop increased and the number of boxes decreased. There was no grand plan. Every new floor model tool required some degree of rearrangement.
When I built my router table, in order to make room for it in an accessible space, I had to dissasemble and move a fixed shelving unit, and to place the shelve in new location, I had to move something else, and that left me short of room for another thing, so I dealt with that. It was like falling dominoes.
I know a billionaire who walked into Wood Craft and said, “I want to take up woodworking. Tell me what I need for a state of the art shop. Then ship it out to my place in the mountains and set it up for me.” Wow, if you could do that, you could put everything in the right place and never have to rearrange the shop. I’ll bet you could do a near perfect job of setting up your shop under those conditions.
The point of this is that just as my shop get rearranged, so does my tool storage. What worked yesterday may not work today.
Here’s a hint: If you’re always looking for a certain tool, then it’s either in the wrong place, or it doesn’t have a specific home.
I like tools on pe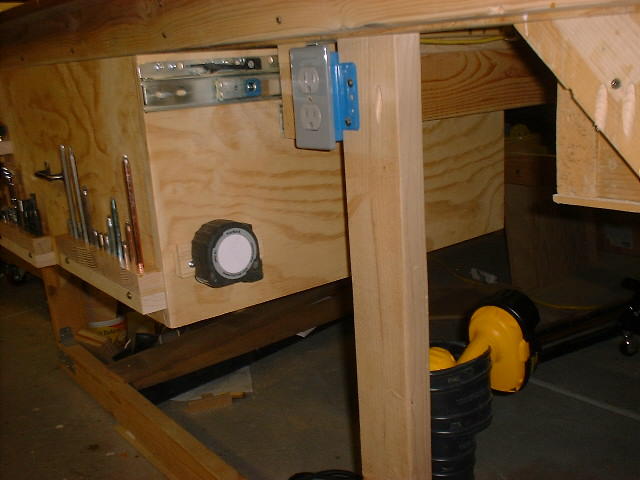 gboards, easy to find. But I woke up one day and came to the conclusion that hand held plug in power tools do not belong on pegboard because the dangling cords get tangled and get in the way. So I looked around and discovered that there was space under my outfeed table for a 12x24x24” drawer. Toss in some adjustable ¼’ hardboard dividers and my corded power tools had a new home. That freed up a lot of pegboard real estate. Nice. Notice in this picture that I have a tape measure stored on the side of the drawer, different driver bits on the front for quick access, my portable drill-driver mounted behind the support leg of the outfeed table, and an electric outlet right there so I don't have to drape electric cords all over the shop floor.
It was driving me crazy that I had sanding supplies all over the shop. Not organized. I assembled all the sanding supplies (that I could find) on my workbench. Sand paper, belts, drums, sponges, etc. I made a plan and executed it. It wasn’t hard, and now I know where my sanding supplies are, assuming that I put them back after I’ve used them. I built a box the size of a sheet of sandpaper with shelves about an inch apart and I put the finer grain paper on the top shelf and worked my way down. The belts and drums hang from dowel pegs right above the sheet storage and the sponges sit next to the sheets.
If you’ve ever seen No rm’s New Yankee Workshop show where he builds that router table, you understand why, when I built it, that I was able to put all of my routing supplies in one place. It has a lot of storage. Many of my jigs and feather boards don’t fit in the router table, but they hang from the will right behind it. Organized and accessible. About time!
I have a 12” bench model drill press that had been sitting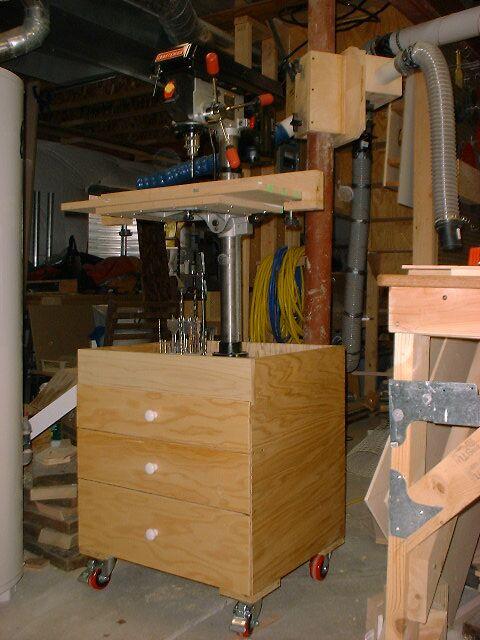 on a small support table I purchased from Sears. It was not the right table, not sturdy/steady enough, no wheels, and it had no storage. I ignored that problem for so long that it is embarrassing. Having some 3/4” plywood hanging around doing nothing, I built a new support table. Put it on good 3” casters and put in three full-extension drawers. Now I have all my drilling supplies in one place, and that place is right under the drill press.
My table saw push sticks and feather boards were all over the place and hard to find. There was space for a drawer right next to the table saw under the ‘return’ of the outfeed table. I used some left over drawer slides. Nice and handy.
My great ideas don’t always work out. My two battery powered drills had no home. They wandered around the shop by themselves. I had an inspiration. I hinged a portion of the top of the outfeed table and built a storage area under the hinged section. Turned out not to be a great idea. My outfeed table doubles as a work bench. When’s the last time you saw a work bench without anything on it? Whenever I wanted one of those drills, I had to move all kinds of things so I could lift up the hinged top. Organized, yes. Accessible, no. Now I have a specific place for both drills. One mounted behind a leg on my outfeed table (see picture above) while the other is on a leg of my workbench.
How about the tools that you always need? Pencils for example. I used to think that if I had a dozen pencils lying around the shop, one would always be in reach. Bull pucky to that theory. So I built a bunch of pencil holders and put them in places where I was likely to want a pencil. Nothing fancy, but now my pencils have homes and I can find them.
I bought a nice 16’ tape measure that has a flat tape. It’s a wonderful thing for woodworking, measuring on sheet goods or long boards where you don’t need a curved blade that will stand out by itself. You don’t have to try to read the measurements around the curve of the tape and it’s easy to make your mark accurately with the flat tape. I made a special hanger for it right on my outfeed table. I can reach down without even looking and pull it out. I know where it is and it is where I’m most apt to be using it. Yes, you guessed it, there’s a pencil holder right next to it.
I wrote that I like pegboard, but it has limitations. In the middle of changing a blade on the table saw, I realized that six 10-inch blades took up an awful lot of pegboard real estate. I took some scrap 1/4” and 1/8” plywood. Cutting offset semi circles in the 1/4” pieces, separated by solid 1/8” pieces, I made a slotted holder for all six blades that takes up about as much room as 1-1/2 blades hanging from pegboard. An unplanned benefit was that I can take it off the wall and set it on the table saw. It is wide enough to stand up. Then I can pull the blade off the saw and put it right in the holder and pull another blade out of the holder and onto the arbor. I don’t have to look around for a scrap of wood to lay the blades on while changing them.
Wall space is always at a premium, there’s only so much of it. I had a bank of tip out small parts bins. 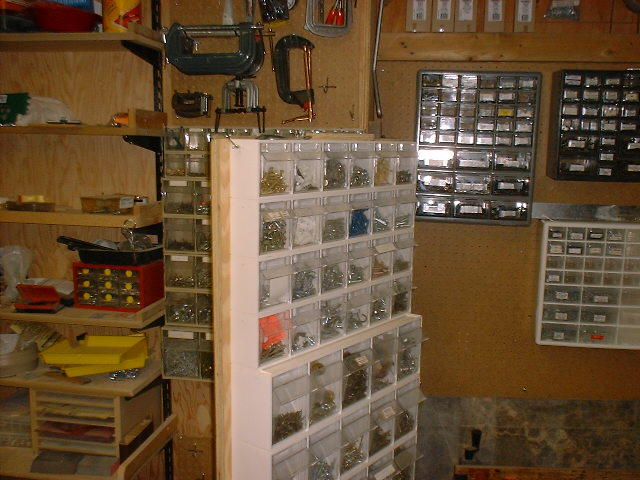 They filled up rapidly, so I bought more bins, but then I couldn’t find a pl
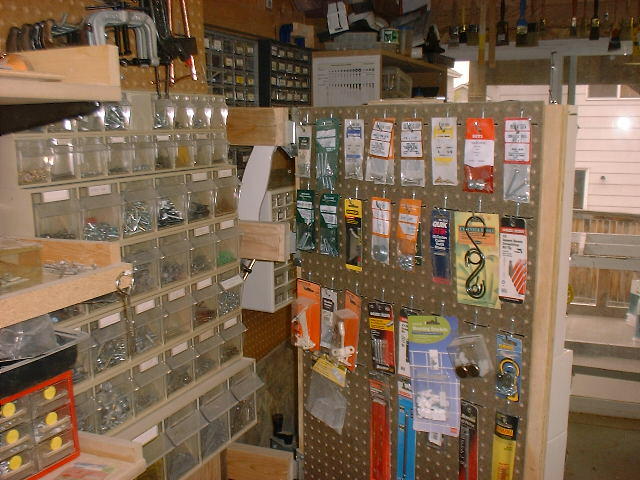 ace to put them near the rest of the small parts. No wall space left. I solved the problem by attaching a hinged piece of 3/4" plywood ‘door’ in front of the existing parts bins, and I screwed the new parts bins on the door. Now I can get at the bins behind the door and the bins on the door. On the back of the door I put some pegboard and I hang those silly little poly bags of screws or nuts that I bought but never opened.
I've got a window in the basement that I never use as a window. It's back in the corner and out of the way. What a great place to store my bar clamps.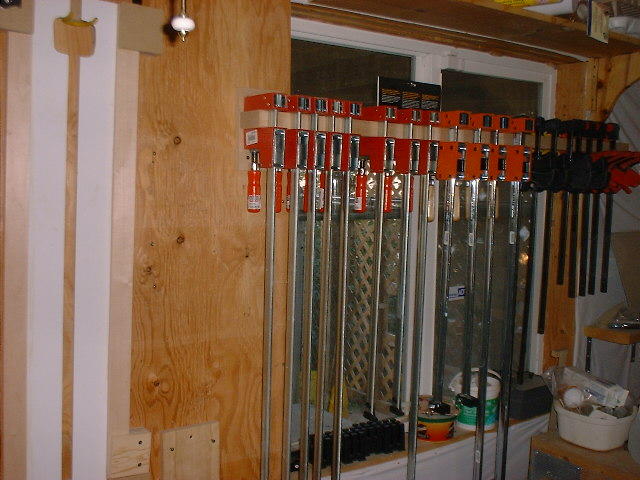
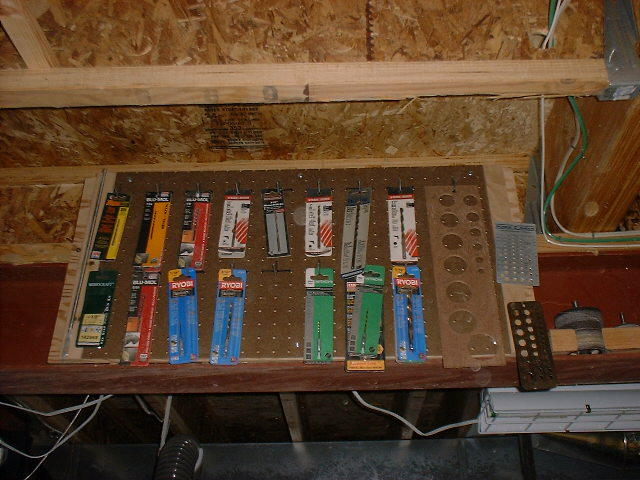
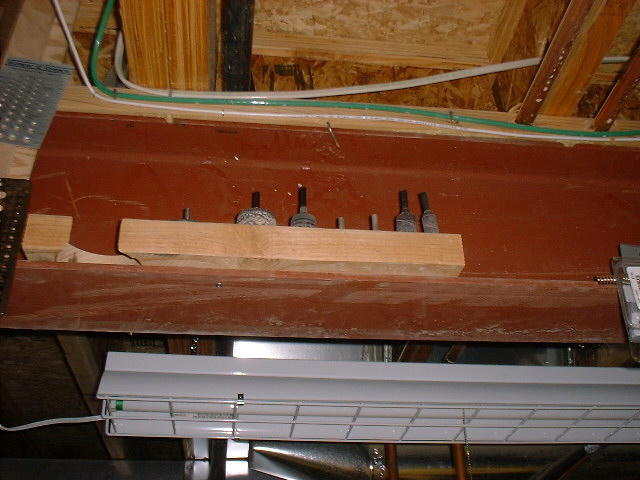
What about using the ceiling? My shop is in an unfinished basement. I have all kinds of things hanging from the joists. I use my sanding drums on the drill press, so I have the sanding drums stored on the metal I-beam where I can reach up and get one without leaving the drill press. The chuck key to my drill press hangs from a magnet on the drill press. This picture on the right is my ceiling storage for duplicate drill bits just waiting to replace the next one I break.
If you start thinking like this, you’ll begin reorganizing how you store your tools and shop supplies.
I’ve seen peg board that has the outline of tools painted on it so you’ll always put the tool back in the same place. I don’t like that because I’m always reorganizing and the paintings won’t follow the hooks when I move them. I use my tools enough that I know where they are (or where they should be).
posted by High Altitude Wanderer at 11:18 AM
1 comments
![]()
![]()

